How To Transform Your Room With Statement Ceiling Decals (No Paint Needed)
Most people decorate their walls, floors, and furniture but leave the ceiling completely bare. That overlooked surface has the power to change the entire feel of a room and make it look more finished, stylish, and intentional. Statement ceiling decals are a creative, no-paint solution that adds visual interest without the hassle of traditional renovations.
They’re a great option for renters, small space decorators, or anyone who wants a bold update that’s easy to install and remove.
In this post, you’ll learn how to use ceiling decals to instantly refresh your room and turn a plain ceiling into a standout design feature.
Check out this post: 17 Genius Home Bedroom Refresh Ideas Every Renter Can Pull Off
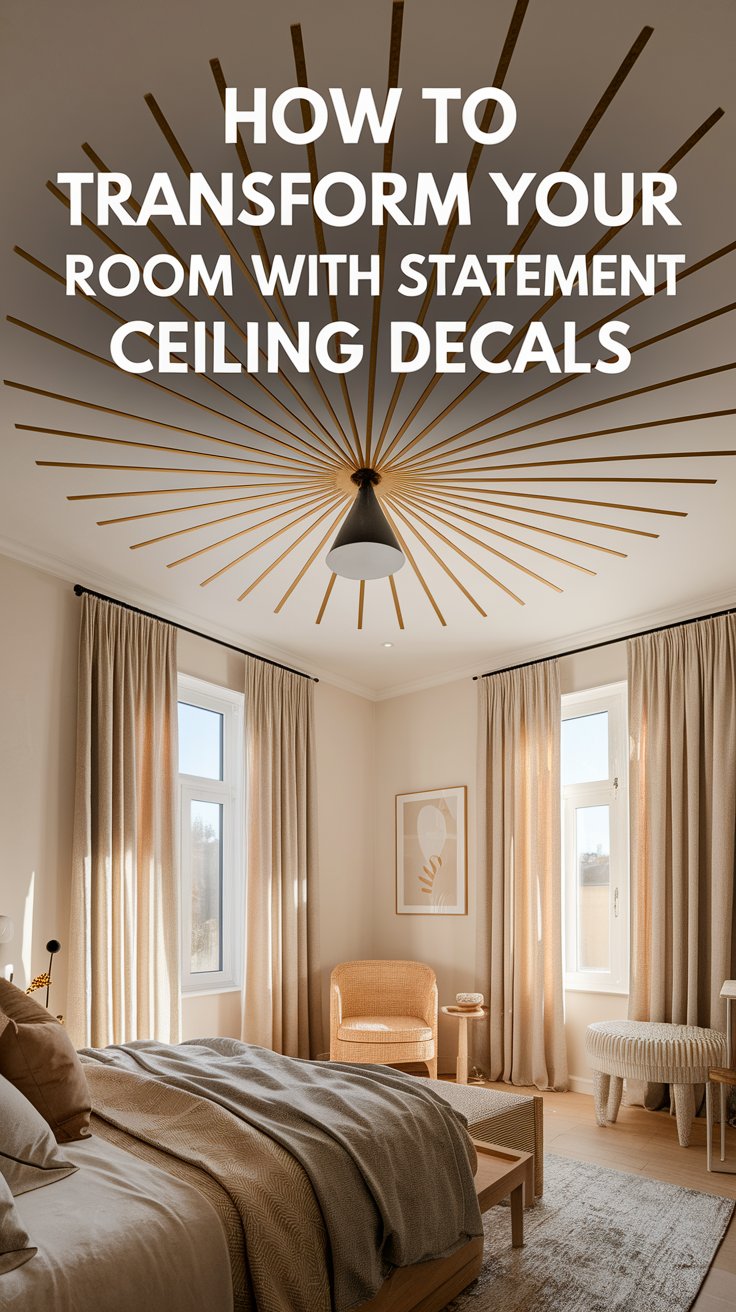
What Are Statement Ceiling Decals?
Statement ceiling decals are large, peel-and-stick designs made specifically to decorate ceilings.
Unlike traditional wallpaper or small stickers, these decals are designed to make a bold impact by covering a significant portion of the ceiling or creating a unique pattern overhead.
They come in a wide range of styles, from simple geometric shapes and delicate floral prints to modern abstract art and vintage-inspired motifs.
Most ceiling decals are made from high-quality vinyl, making them lightweight, flexible, and easy to apply.
Some are even repositionable, allowing you to adjust them during installation or move them to a new spot later. They stick securely to smooth, clean surfaces without requiring glue, nails, or paint, making them a perfect option for renters or anyone wanting a change without a major commitment.
Best Places to Use Ceiling Decals
Not every ceiling needs to stay blank. Some spaces in your home are perfect opportunities to add a statement ceiling that feels both stylish and intentional. Ceiling decals work especially well in rooms where a little extra character can make a big difference.
1. Above the Bed or Crib
Adding ceiling decals above a bed or crib creates a cozy, tucked-in feeling without taking up any wall space. Soft patterns like clouds, stars, or subtle arches can make a bedroom feel more personal and inviting. In nurseries, gentle decals overhead give babies something calming to look at while lying in their cribs.
2. Home Office or Reading Nook
A bold ceiling design can make a small home office or reading nook feel more inspiring. Geometric patterns, soft abstract designs, or even a faux skylight effect add just the right amount of energy without cluttering your desk or shelves. It is a great way to bring personality into workspaces that might otherwise feel plain.
3. Entryway or Hallway
Entryways and hallways are often overlooked when decorating, but they have so much potential. Installing ceiling decals in these narrow spaces instantly creates a stylish first impression. Metallic finishes, bold stripes, or dramatic prints make tight areas feel more open and curated.
4. Bathroom or Vanity Area
Bathrooms may be small, but they can still make a big style statement. A set of simple ceiling decals above a bathtub or vanity area can turn a functional space into a spa-like retreat. Moisture-resistant decals are best for bathrooms to ensure they stay looking good even with steam or humidity.
How to Install Statement Ceiling Decals
Installing statement ceiling decals is simple when you have a clear plan.
Follow these step-by-step instructions for a smooth, professional-looking finish.
Step 1: Gather Your Supplies
You’ll need your peel-and-stick decals, a step ladder, painter’s tape, a plastic smoothing tool or credit card, a measuring tape, a pencil, and a level.
Step 2: Prepare the Ceiling
Wipe the ceiling with a clean, damp cloth to remove dust and let it dry completely. A clean surface helps the decals stick properly and last longer.
Step 3: Plan Your Layout
Use painter’s tape to lightly place a few decals on the ceiling without peeling the backing. Step down, look at the spacing from different angles, and adjust the layout until you’re happy with the design.
Step 4: Mark Light Guide Points
Lightly mark the center points or edges with a pencil based on your layout. Use a level to help keep your lines straight if you’re working with geometric or repeating patterns.
Step 5: Apply the First Decal
Peel back a small section of the backing, about 10–15 cm. Line up the edge with your guide marks and press it onto the ceiling, starting from the center and moving outward. Peel more backing slowly as you go, smoothing out air bubbles.
Step 6: Smooth and Press
Use your smoothing tool to press the decal firmly onto the ceiling, working from the center out to the edges. Push any air bubbles gently toward the sides to remove them.
Step 7: Apply the Rest of the Decals
Continue adding decals one by one, using your level and guide marks to maintain straight lines and even spacing. Reposition carefully if needed before pressing down fully.
Step 8: Final Check
Stand back and look for any loose edges or bubbles. Press them down firmly and double-check that all decals are securely attached.
Styling Tips for a Cohesive Look
Once your ceiling decals are up, the next step is making sure the rest of your room complements the new look. Without the right balance, the ceiling can feel disconnected or overpowering. These tips will help you style the space so everything works together and feels intentional.
1. Match the decal with your room’s color palette
Choose ceiling decals that either blend with your existing colors or add a clear contrast without clashing. For example, gold or terracotta decals work well with neutral rooms, while black or navy designs add drama to white or light-colored spaces.
2. Keep the walls and furniture simple
If your ceiling design is bold or patterned, avoid competing elements on the walls. Stick to clean lines, soft tones, or solid colors on bedding, curtains, and larger furniture pieces.
3. Use lighting to highlight the design
Hang a pendant light or chandelier directly beneath the ceiling decals to draw the eye upward. Stick with open or minimal fixtures that won’t cover the design.
4. Add one or two matching accents below
Repeat the decal’s color or pattern somewhere else in the room. This could be a throw pillow, a small piece of art, or a textured rug. It helps the ceiling feel connected to the rest of the space.
5. Choose one focal point only
Let the ceiling be the main feature. Avoid using busy wallpaper, heavy wall art, or patterned upholstery in the same room unless it matches the decal perfectly.
Where to Buy the Best Ceiling Decals
Finding the right ceiling decals can make all the difference. The best options are easy to apply, remove cleanly, and come in a variety of styles to match your space. Before you order, it’s important to look at size, material, and reviews to make sure you’re getting something that sticks well and holds up over time.
1. Etsy
Etsy has a wide range of handmade and custom decals, including large-scale designs and unique patterns you won’t find elsewhere. It’s a great place to find designs that match specific themes or color palettes.
2. Amazon
If you want something fast and affordable, Amazon has many peel-and-stick ceiling decals, including stars, floral patterns, mandalas, and geometric designs. Be sure to read reviews and check product photos from real buyers.
3. Urban Outfitters
For modern and artistic styles, Urban Outfitters often carries wall and ceiling decals with a more creative, boho aesthetic. These work well in bedrooms, reading corners, and small apartments.
4. WallPops and RoomMates Decor
These two brands are known for making renter-safe wall products, including ceiling decals. Their decals are usually vinyl, easy to reposition, and safe for painted surfaces.
5. Small independent shops
Look for local or online decor stores that specialize in vinyl decals or wallpaper. These shops often offer higher-quality materials, better adhesive, and unique styles that help your space stand out.
What to Look For:
- Adhesive that’s strong enough to stay up, but removable
- Sizing that fits your space (measure first)
- A finish that won’t reflect too much light (matte works best)
- Clear application instructions
- Optional: decals labeled “reusable” if you plan to move them later
Choosing quality decals from trusted sources will save you time and help you get the polished look you want without frustration.
Conclusion
Ceiling decals are one of the easiest ways to bring life, color, and creativity to your space without using a single drop of paint. They offer a simple and renter-safe solution that can completely change the look and feel of any room in just a few steps. This no-mess upgrade is perfect for turning a plain ceiling into a standout feature in a bedroom, hallway, or home office.
Now that you know how to install and style them, you’re ready to give it a try. Choose a design that fits your space, follow the steps, and enjoy the instant transformation. Save this post for later and share your ceiling refresh with us. Your results might inspire someone else to do the same.
FAQs
Do ceiling decals really stay up over time?
Yes, as long as they’re applied to a clean, smooth surface. High-quality vinyl decals can stay up for several years without peeling. Humidity, ceiling texture, and poor prep are the most common reasons decals fall off early, so make sure to clean the ceiling well and follow the manufacturer’s instructions.
Will ceiling decals damage the paint?
Most peel-and-stick ceiling decals are designed to be removable without causing damage. If your ceiling was painted recently, allow at least 30 days for the paint to cure before applying decals. When you’re ready to remove them, peel slowly and carefully from one corner to avoid lifting any paint.
Can I use ceiling decals on a textured ceiling?
It depends on the texture. Light textures like orange peel might work, but popcorn ceilings and rough surfaces usually prevent the adhesive from sticking properly. If your ceiling is heavily textured, test a small sample first to see if it holds.
Are ceiling decals safe for kids’ rooms?
Yes. Most vinyl decals are non-toxic and safe for kids’ spaces. They’re great for adding stars, clouds, or name decals above cribs and beds. Just make sure they’re out of reach and applied securely so they don’t peel or fall over time.
How do I clean around ceiling decals?
Use a dry or lightly damp microfiber cloth to wipe near the decals. Avoid using too much water, harsh chemicals, or scrubbing, especially around the edges. If needed, gently dust them during your regular ceiling or fan cleaning routine.