19 DIY Bathroom Vanity Ideas So Stunning, You’ll Forget They’re Homemade
A beautiful bathroom vanity can instantly elevate your space. It’s not just a place to wash your hands or stash toiletries, it often becomes the visual anchor of the entire room.
But custom vanities can come with custom price tags, and store-bought options often feel generic.
That’s where DIY comes in.
With the right materials and a little creativity, your homemade vanity can look more high-end than anything you’d find in a showroom.
Let’s dive into 19 inspiring ideas you can start on today.
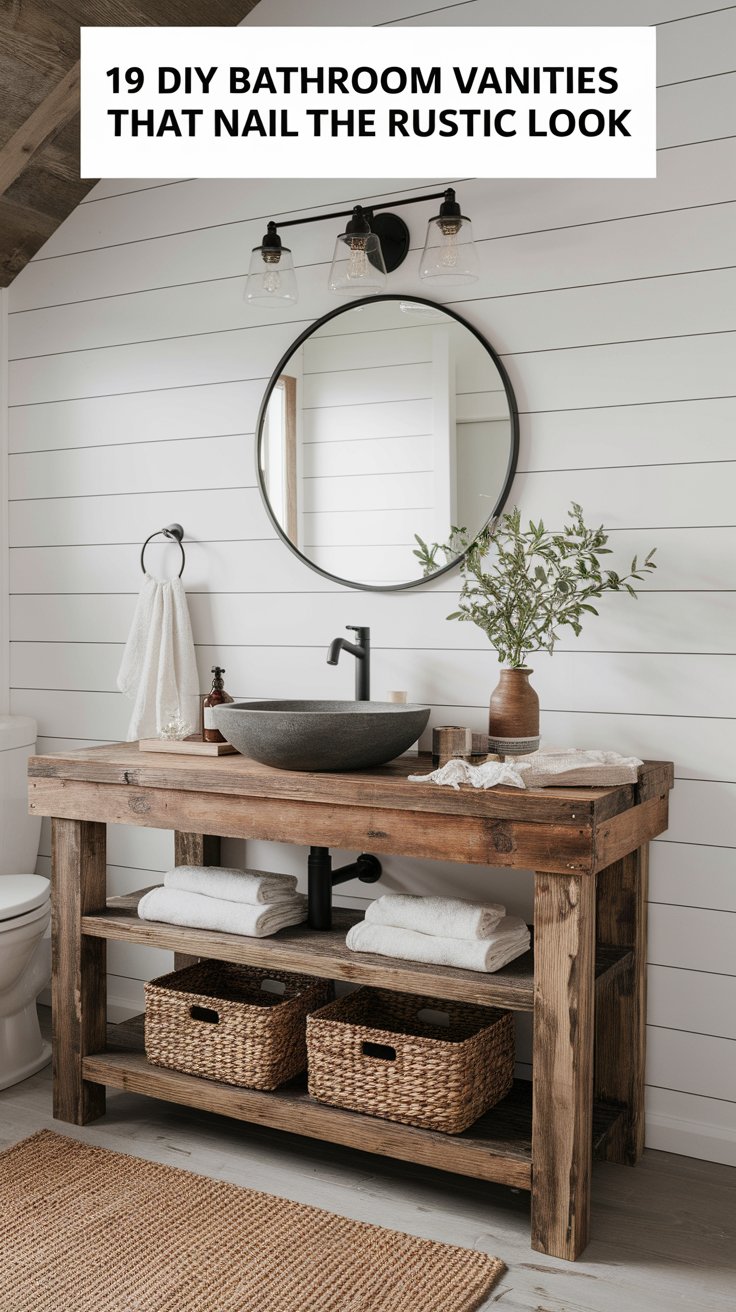
1–3. Rustic Wood Vanities That Feel Handmade (In the Best Way)
Rustic-style vanities offer warmth and timeless appeal. They look handcrafted and intentional, and they’re surprisingly easy to build or refinish.
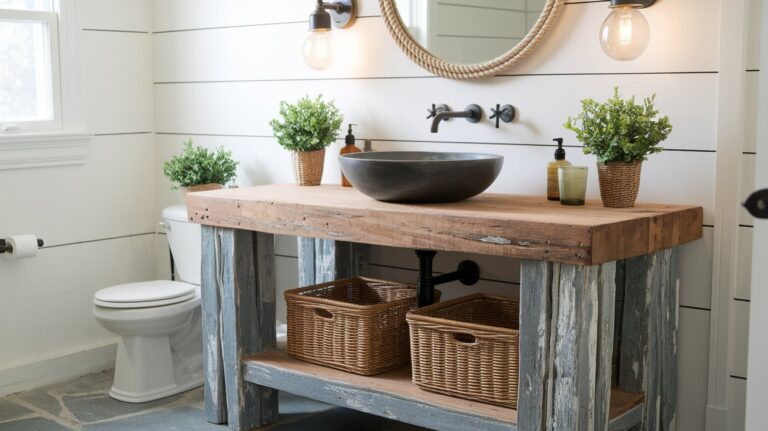
1. Reclaimed Wood Vanity With Open Shelves
What You’ll Need:
- Reclaimed or distressed lumber (cedar, pine, or oak)
- Pocket hole jig, wood screws, sander
- Clear matte sealer or water-based polyurethane
- Drop-in or vessel sink
How to Build It:
- Frame a sturdy rectangular base using 2x4s or thick reclaimed planks.
- Add an open lower shelf using slats or a full plank.
- Cut the top panel to size, leaving a hole for the sink and faucet.
- Sand thoroughly and finish with a waterproof sealant.
Why It Works:
The character in the wood grain adds visual warmth, and the open shelf keeps it feeling airy and functional.
2. DIY Farmhouse Console Vanity With Towel Bar
Project Idea: Use a simple farmhouse table design and customize it with bathroom-friendly features.
Key Features:
- Whitewashed finish or stained wood top
- Built-in towel bar on the side
- Decorative X-brace detail in the legs
- Undermount or vessel sink
This style pairs beautifully with shiplap walls, matte black fixtures, and cozy lighting.
3. Natural Wood Vanity With Live Edge Countertop
Materials:
- Live edge wood slab (sealed with waterproof resin or tung oil)
- Pre-built vanity base or simple wood cabinet
- Vessel sink + wall-mount faucet
Steps:
- Cut the slab to vanity width and sand edges to soften splinters.
- Treat with multiple coats of water-resistant oil or sealant.
- Mount on your base or secure directly to wall brackets.
Design Tip:
Let the natural grain shine. Pair with stone or matte black tile to emphasize the organic textures.
4–6. Furniture Flip Vanities You Won’t Believe Aren’t Custom
Repurposing furniture is one of the easiest ways to get a high-end vanity without custom carpentry.
4. Vintage Dresser Turned Vanity
How to do it:
- Remove the top drawers or modify the drawer boxes for plumbing
- Cut a hole for the sink and faucet
- Seal the surface with marine-grade varnish
- Reinstall drawer fronts for faux-drawer charm
Picture This: A weathered oak dresser painted navy with brass pulls and a modern white bowl sink—old meets new in the best way.
5. Console Table Vanity With Open Base
A narrow console table is perfect for smaller bathrooms. Choose one with a sturdy frame and minimal detailing.
Upgrade tips:
- Repaint in matte black, olive green, or cream
- Add a quartz or wood top
- Style the open bottom with wicker baskets for storage
Bonus: The open design keeps the space feeling light, especially in tight bathrooms.
6. Painted Sideboard With Vessel Sink
Use a low sideboard or credenza for a double-sink vanity setup or for more counter space.
Steps:
- Sand and paint the piece in a bold color like forest green or burnt sienna
- Add new hardware (brass or matte black)
- Install a solid surface top with one or two vessel sinks
- Cut openings for plumbing as needed
This project offers built-in storage and a custom feel that rivals luxury bathroom furniture.
7–9. Minimalist & Modern DIY Vanities That Look Store-Bought
Modern style is all about restraint—clean lines, muted colors, and quality materials. These vanities offer that aesthetic without the designer price.
7. Floating Wall-Mount Wood Slab Vanity
What You’ll Need:
- Thick butcher block or hardwood plank (sealed for water-resistance)
- Heavy-duty wall brackets or floating shelf hardware
- Wall-mount faucet
- Above-counter vessel sink
Steps:
- Mount the brackets into wall studs at sink height.
- Secure the slab to the brackets, allowing for sink placement.
- Install vessel sink and faucet.
- Seal any cut edges and double-seal the top.
Why It Works:
This style keeps the floor space open, ideal for small or modern bathrooms. Pair with black fixtures and under-lighting for extra polish.
8. Concrete Countertop Over Ikea Base Cabinet
Use Ikea kitchen or bathroom cabinet bases, and top them with a DIY concrete counter.
Materials:
- Concrete mix + melamine mold for countertop
- Ikea “Godmorgon” or “Sektion” cabinets
- Paint or veneer wrap for custom finish
Step Breakdown:
| Step | Description |
|---|---|
| Build mold | Use melamine boards to form a counter mold |
| Pour & cure | Mix, pour, and let the concrete cure completely |
| Seal | Use a food-safe, waterproof concrete sealer |
| Attach | Secure to the cabinet base and install sink/faucet |
This look balances utility and aesthetics, perfect for industrial or minimalist bathrooms.
9. Whitewashed Plywood Vanity With Integrated Sink
Plywood doesn’t sound fancy—until you whitewash it, seal it, and give it a crisp rectangular form.
How to Build It:
- Use high-grade plywood sheets for box-style frame
- Apply a whitewash or soft beige wood stain
- Top with an integrated sink or stone slab
- Add flat panel drawer fronts and minimalist hardware
Bonus Feature: Soft-close drawer sliders give a luxury feel to a very budget-friendly project.
10–12. Small Space DIY Vanity Ideas That Maximize Every Inch
Small bathrooms are the perfect place to experiment with custom vanities. These ideas help you make the most of your square footage with compact, stylish designs.
10. Narrow Vanity With Hidden Storage Drawers
Why It Works:
Narrow doesn’t have to mean less useful. By extending vertically or cleverly hiding storage, you can build a slim vanity that still offers serious function.
What You’ll Need:
- 1×12 or 1×10 lumber for a slim cabinet frame
- Shallow drawer slides
- Compact sink basin
- Slim faucet (wall-mount preferred)
Build Guide:
- Construct a narrow rectangular base (around 14 inches deep).
- Install shallow drawers with soft-close slides on the top half.
- Leave the bottom open for a shelf or baskets.
- Finish in light tones or paint to match your walls to visually expand the space.
- Use drawer organizers to maximize the shallow interior.
Style Tip: Add a vertical mirror above with sconce lighting to stretch the space visually.
11. DIY Corner Vanity With Floating Base
Ideal For: Half baths, attic bathrooms, or awkward layouts where a standard vanity won’t fit.
Materials:
- Triangular or square plywood cut to fit your corner
- Wall-mount brackets or corner shelf hardware
- Vessel sink
- Small faucet or wall-mounted fixture
- Towel hook or rod mounted nearby
Instructions:
- Cut and assemble a triangular vanity top using a high-quality plywood or butcher block.
- Mount securely into wall studs on both sides.
- Attach a vessel sink and run plumbing up through the wall or base.
- Seal all wood surfaces for water protection.
Add-Ons:
- A corner shelf below for toilet paper or cleaning supplies
- A slim framed mirror that follows the shape of the vanity
This project keeps the bathroom open and functional while still feeling thoughtfully designed.
12. Floating Shelf Vanity With Towel Bar and Storage Baskets
Why It Works:
This option is clean, modern, and highly adaptable. The floating shelf gives you countertop space while leaving the area underneath free for baskets or bins.
Materials:
- Hardwood or butcher block shelf
- Heavy-duty floating shelf brackets
- Vessel or drop-in sink
- Wall-mount faucet (to save counter space)
- Under-shelf mounted towel rod
How to Build It:
- Install wall-mounted brackets into studs.
- Attach shelf and drill cutouts for plumbing.
- Install the sink and faucet.
- Attach a towel rod to the bottom of the shelf (underside or side).
- Place one or two baskets underneath for storage.
Best For: Studio apartments, minimalist bathrooms, or guest baths that don’t require large storage space.
Visual Styling Tip: Choose a warm wood tone for the shelf and pair with matte black metal for a modern rustic feel.
13–15. Painted & Repurposed DIY Vanities With a Pop of Color
Color has the power to transform even the plainest vanity into a standout feature. These projects are ideal for those who want something with personality, charm, and just a bit of drama.
13. Boldly Painted Thrifted Cabinet Vanity
What You’ll Need:
- Old cabinet, buffet, or nightstand
- Sandpaper or orbital sander
- Primer and quality furniture paint (satin or semi-gloss)
- Water-resistant topcoat
- Vessel or drop-in sink
- New hardware for modern appeal
Steps:
- Sand down the piece and clean thoroughly.
- Prime and paint in a bold color like emerald green, navy blue, or terracotta.
- Cut a hole in the top for plumbing and sink.
- Add modern hardware—brass, black, or brushed nickel.
- Seal with a waterproof clear coat.
Design Tip: Coordinate the vanity color with subtle accents like artwork or towels for a cohesive look.
14. Two-Tone Vanity With Contrasting Drawers
Project Description:
Give your existing vanity new life by painting the base and drawer fronts in contrasting but complementary tones.
Color Pairing Ideas:
| Base Color | Drawer Color |
|---|---|
| Deep forest | Warm white |
| Dusty rose | Cream or brass |
| Charcoal gray | Soft sage green |
| Indigo blue | Natural wood |
Steps:
- Remove all hardware and drawers.
- Sand lightly to ensure adhesion.
- Paint base and drawer fronts separately.
- Reattach hardware or upgrade with gold or matte black finishes.
- Optional: Add a stencil or label for a vintage apothecary look.
This adds interest without requiring new construction.
15. Repurposed Desk Turned Statement Vanity
Why It Works:
Old desks often have great proportions and drawer space, making them ideal for turning into one-of-a-kind vanities.
How to DIY It:
- Find a solid wood desk (not laminate).
- Remove the center drawer to make room for plumbing.
- Sand, prime, and paint in a statement hue like mustard, jade, or matte black.
- Cut a hole in the top for the sink basin.
- Add a stone-look vinyl or tile top for contrast.
- Finish with modern hardware and coordinating mirror.
Bonus Touch: Use peel-and-stick wallpaper on the drawer interiors for a hidden splash of pattern.
16–18. DIY Farmhouse Bathroom Vanities with Storage
Farmhouse vanities are known for their cozy, collected feel. But they’re also excellent for hiding clutter while showing off texture and craftsmanship. These DIY versions give you that look without spending thousands.
16. Sliding Barn Door Vanity
Why It Stands Out:
The sliding door adds visual interest while also saving space—no swinging doors to bump into in a tight bathroom.
Materials You’ll Need:
- 2x4s or 2x6s for framing
- Plywood or shiplap paneling
- Barn door hardware (mini or cabinet-sized)
- Metal pull handles
- Waterproof stain or sealer
How to Build It:
- Build a rectangular frame with a shelf inside for baskets or bins.
- Attach a rail and roller hardware kit for the door.
- Build a single shiplap door or use tongue-and-groove boards.
- Mount a solid wood or stone-look top and install the sink.
Storage Tip: Use open shelves inside for rolled towels or labeled bins.
17. Open-Shelf Vanity with Wire Baskets
Best For: Smaller bathrooms or guest bathrooms where open access is more important than hidden storage.
Design Overview:
- Top shelf for your sink and daily essentials
- Lower shelf for baskets, bins, or folded towels
- Optional: Add a towel bar to one side for convenience
Materials:
- 2×4 or 2×2 wood frame
- Wood slats or plywood for the shelf
- Woven or wire baskets
Assembly Steps:
- Build two shelf frames (top and bottom) and attach four legs.
- Add side supports for stability.
- Paint or stain and seal everything for bathroom durability.
- Top it with a drop-in sink or above-counter basin.
Style Bonus: Match your baskets to your metal finishes for a consistent look.
18. Shiplap-Wrapped Vanity Base With Drawers
For the Handy DIYer:
This one takes a bit more skill but delivers a fully custom, built-in look.
Materials:
- Cabinet-grade plywood for box and drawer construction
- Shiplap or tongue-and-groove boards for exterior wrap
- Drawer sliders (soft-close optional)
- Stone or wood top
- Paint or whitewash stain
How to Build:
- Build the vanity box with drawer compartments or cubbies.
- Wrap the front and sides in vertical or horizontal shiplap panels.
- Install drawer boxes and fronts.
- Paint and seal, then install hardware.
Visual Styling: Top with brushed brass pulls and a vintage-style faucet for true farmhouse appeal.
19. Vanity Built Completely from Scratch (For True DIY Enthusiasts)
If you’re ready to go beyond flipping furniture or repurposing pieces, this build-from-scratch project gives you total control over size, layout, materials, and style.
Ideal For: Custom-sized bathrooms, high-end finishes, and those who want a designer look on a budget.
Materials You’ll Need:
- Cabinet-grade plywood or hardwood for frame and sides
- Drawer slides or cabinet hinges
- Wood glue, nails, screws
- Sink and faucet of your choice
- Countertop (store-bought, tiled, or poured concrete)
- Primer, paint or stain, and waterproof topcoat
Build Overview:
| Step | Task |
|---|---|
| 1 | Measure your space and sketch a detailed plan including sink location and plumbing access |
| 2 | Cut your panels for sides, back, top, and interior supports |
| 3 | Assemble the frame with wood glue and screws; reinforce corners |
| 4 | Add doors or drawer frames and install hardware |
| 5 | Cut the top panel to fit your sink and faucet |
| 6 | Finish with your choice of stain or paint, and waterproof every exposed area |
Customization Ideas:
- Add beadboard inside the cabinet doors for vintage charm
- Use furniture feet or legs for an elevated look
- Mix wood and painted finishes for a high-end two-tone appearance
This is the most time-consuming project—but also the one with the most reward.
Final Thought
DIY bathroom vanities give you the freedom to match your style, budget, and skill level—all while making your space feel unique. You can repurpose a forgotten piece of furniture, build from scratch, or make small updates that look like a total transformation.
Pick the idea that fits your goals and jump in. Whether you’re working with power tools or just a can of paint and a vision, you can create a stunning vanity that feels truly your own.
FAQs
What type of wood is best for a bathroom vanity?
Hardwoods like oak, maple, and teak are durable and moisture-resistant. If you’re on a budget, cabinet-grade plywood works well when sealed properly.
How do I waterproof a DIY vanity?
Use waterproof wood glue, a quality primer, and a clear polyurethane or marine-grade sealer. Be sure all exposed edges and cutouts are sealed thoroughly.
Can I use any piece of furniture as a vanity?
Yes, as long as it’s structurally sound and can accommodate plumbing. You’ll need to modify it by cutting holes for pipes and possibly removing drawers to make space.
What’s the easiest DIY vanity idea for beginners?
Flipping a vintage dresser or painting an old cabinet is a great beginner project. It requires minimal building and mostly focuses on surface changes.
Do I need special tools for these projects?
Basic tools like a drill, jigsaw, sander, and screwdriver are enough for most of these builds. For more advanced projects, a circular saw and pocket hole jig are useful additions.